Vintage Airstream Renovation Adventures - The Beginning
Anna
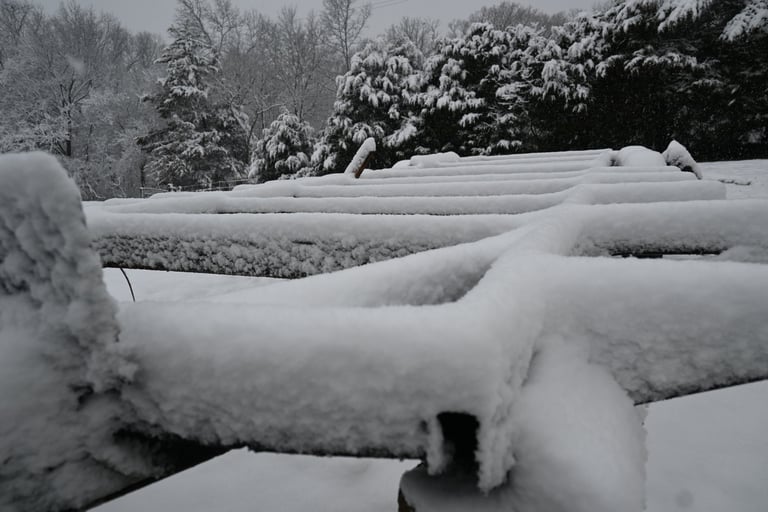
Like many things it started with an internet Marketplace scroll. I was looking for something to travel in. A cheap used RV that would take me and my dog around the country. The Airstream came across my page, about an hour from my home and with a price I could live with. Something that I could update the interior of to suit me exactly how I liked and most importantly it didn't have a slideout! I hate slideouts. I looked up some information on renovations of these Iconic Vintage RVs and thought I knew what to look for when we went to take a look at it. For a 40+ year old RV it was in pretty good shape. The old and broken vinyl that covered it seemed to have protected it pretty well. The axles were old but not to far gone, the windows were all in tack and the small bad spot in the floor that the owner pointed out was in a place that should have been easy enough to fix. Honestly, I could have taken it on an adventure right away but it was dirty and I really wanted to make some updates. Also, I had a whole house (that I owned) that I needed to do something with.

So I began planning and implementing those plans to get out on my adventure. It started out with a few long weekends of DEMO DAY! Which when you are trying to save most of the vintage pieces takes a lot longer than just tearing it apart. Thankfully my family has an extensive multi-generational collection of random tools. So I was very lucky in not needing to buy any for this part of the renovation. However, these are tools I used frequently and think were the most useful in the demo phase. Since I already had them I went with the same brand as what we have. Do some research on the product and make sure they are still quality before purchasing.
Crow Bar: https://amzn.to/3MMhf5U
Wrecking Bar (A Big Crow Bar): https://amzn.to/3zm5CPV
Impact Driver: https://amzn.to/4emq95L
Angle Grinder: https://amzn.to/4ees8Jk
Hammer: https://amzn.to/4e0RPxn
Wrenchs: https://amzn.to/4eii3vv, https://amzn.to/3XGCcoZ and https://amzn.to/3ZoA7iz
Adjustable Wrench: https://amzn.to/4e2rP4G
Vise Grip: https://amzn.to/4d8MX81
Cordless Drill: https://amzn.to/4eigwpf

*If you click on any of the affiliate/advertiser links on this page and make a purchase on that website, I earn the tiniest commission paid by the retailer at no cost to you. This helps fund my future travels and allows me to continue to share my journey with you. The products are all ones I have used and did not immediately hate/return, so they were good quality and worked well for the purpose.
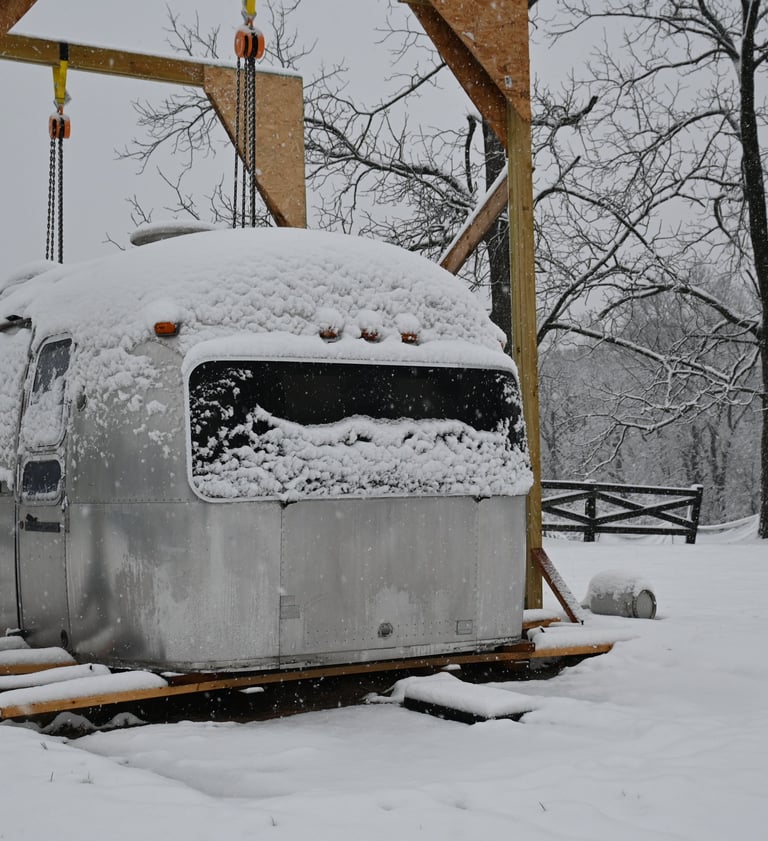
And as with all renovations, I uncovered some significant issues. Mainly a large hole in the rear of the airstream large enough for me to crawl through. The entire back of the airstream was rotted out. This was the first large decision I had to make. Should I call it a day and move on or would I keep going and do a shell off renovation. I had some experience renovating homes but not an RV, especially not an Airstream which is not built anything like a typical home/RV. Luckily I have family who supported me and offered to help with the things I didn't know. So I made the decision to go forward with removing the shell. After building two large gantry cranes and getting a lot of help standing them up.


I spent the numerous hours removing the rivets. (This thing made it so much easier: https://amzn.to/47qGrbn I did have to replace the drill bits once throughout the whole process) Then I faced my fear of the Airstream roof. You have to stand exactly on the ribs (the internal arch structures) and you will damage (pretty much destroy) the entire RV if you put too much weight on the non-rib parts. Straddling the ribs of the roof to get the Air Conditioner off wasn't my favorite and after about twenty minutes the squat position started to get rough.
Notes I Made for Myself to Make Putting the Airstream back together:
The belly pan comes from the bottom and over the top of the main shell the trim covers the seam.
There is aluminum above the spare tire area that needs to be put back on before you put the floor back in.
The floor rotted out at the door, putting a piece of aluminum may help?
You started labeling the parts from the door to the back and around.
The trim around the wheel wells holds the black plastic to the aluminum
All of the seams around the c channel and around the wheel well plastic and the floor have a butyl seam sealer of some sort.
The water tank sat on a 1/2 inch piece of plywood and a piece of aluminum covered the plywood.
The subfloor around the door has to be cut to accommodate the slight drop which goes about half way through the frame.
Don't mess up.


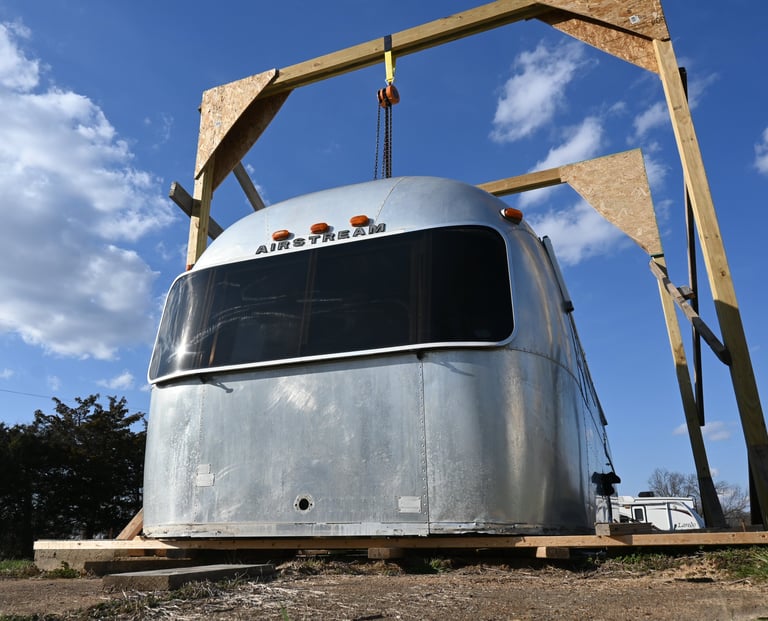
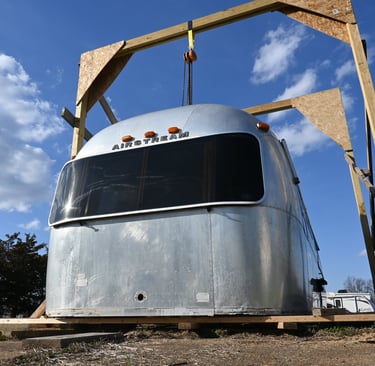

With all of the heavy things off the Airstream began the difficult part, which was removing all of the rivets that held it together. There are a couple of methods, take a hammer and punch and hit the middle and then drill out but I went with getting one of these: https://amzn.to/47qGrbn. This fancy tool sits over the top of the rivet and drills it out centerish. There is a bit of a learning curve but I think it was one of the best investments I made for this. From there I took a beam (a thick 4x6) that was about 15 feet long, I attached two D-Rings weighted to hold 500lbs each and took two 1/2 ton chain hoist and started slowly lifting the aluminum shell off. After finding a few hidden rivets and removing those it came off with a terrifying pop.
Then the exciting part began, I was ready to put the shell back on. After getting the frame back under the shell I began lowering it back onto the frame. I used scrap pieces to wedge between the shell and edge of the c-channel. This did help when it came to getting the shell back on.
Then it came time to rerivet it back together. This required a friend, someone to sit on the inside and do the other side. A Rivet Gun: https://amzn.to/4eicTik, and Clecos: https://amzn.to/3XtPoMy. The rivets I got from vintagetrailersupply.com. They have great resources about rivet sizes and they have crafted some that have the same exterior size but are sized up as needed for when replacing old rivets.
Then the real work began on the trailer frame. I labeled the floor pieces and did everything I could to not destroy the pieces so that I could use them as a template when I cut the new subfloor. This made it more tedious then necessary but also made putting it back together easier in my opinion.
Then I began work on the trailer frame. With the angle grinder in hand I used mainly these attachments: Cut Off Wheel: https://amzn.to/3zj4NqY and a Wire Brush Cup: https://amzn.to/4emt4LQ to grind off all the rust and cut the multiple outriggers that needed to be replaced. With some support from family friends I was able to locally source metal to make repairs to the frame and aluminum to replace pieces that were completely destroyed. Using a local company meant that I was able to save money vs buying online or from a box store.
I am close enough to the Airstream Factory that I was able to take a long weekend and get the outriggers, trim pieces and additional accessories from them directly. Look up the item in your airstreams parts manual and give the parts department a call to see if they still produce that item. A lot of things have changed and some items are not made by them anymore but are available through some other websites.
After I got the rust cleaned off I used POR15 to seal it, two of these prep kits https://amzn.to/3ZoxiOP were enough for the whole trailer frame and I had about 1/4 left of the second one for my 25ft frame. I did end up buying a large can https://amzn.to/3MKuAeY of the paint as the two tiny containers that came with the kit were not enough.
A had someone come out to weld the trailer frame but in my inspection I missed a few tiny spots that may have caused water issues near the water tank in the future so I used the JB Weld Steel: https://amzn.to/3zfahTL putty to cover the whole. This stuff was sold and I had no concerns about it holding up! Once it was welded and painted I moved on to the new subfloor. I bought the plywood and this Seal-Once Marine: https://amzn.to/3MJrkAo (Used 1.5 Gallons). I'm not the most ecstatic about this. Initially it was great but unfortunately there was some standing water and it did have a bad effect on the sealant. There are other options out there that I've seen others choose but it is pricey... However, knowing that my floor isn't 100% does make me wish that I'd spent the money. For your reference, others have used epoxy or put in Coosa Board as an alternative to plywood subfloor. We'll see how well it holds up and how much additional waterproofing materials I feel like I need to use to make sure that this floor does not rot again.